I think it’s safe to assume that if you’re reading this article, you are trying to set up a sewing machine.
You’re likely a novice just trying to figure all of this stuff out, and that’s 100% okay!
Hopefully, this little, instructional article will help you along the way.
Just to clarify, the purpose of this article, we are going to assume that “set up” means setting up the thread in your machine so you can start sewing…we are not going to walk through constructing a machine like some annoying IKEA set.
A really good sewing machine can make just about any sewing job easier and faster, but to be able to get these benefits, you first have to have a working machine…hence you’ll want to set up your machine to get it working for you.
As we all know, there are more than a few sewing machine brand options out there, and each one is a little different than the others. So, when you’re looking at setting up your sewing machine, the first, and most obvious thing to consider is what machine you have.
No matter what machine you end up using, an important first step is to read the manual. The manual can be a gold mine of information that can help you with step by step set up instructions.
Note: if you can’t find the manual or your machine didn’t come with one (this typically only happens with used machines), no worries. You can easily ask the handy-dandy internet for assistance. Your machine also likely has various areas marked with arrows and numbers as steps to guide you in your set up.
The reason the manual is so important goes back to my earlier statement that there are many different brands and they are all a little different. A manual will walk you through the step by step of how to set up the machine YOU have.
Let’s just say you don’t have, or you can’t find the manual for your sewing machine, and you’re not quite sure what to do now, don’t fret, I’ll walk you through it.
Before you begin, you’ll want to do some inventory checking.
You’ll want to make sure you have the following…
- Sewing machine (obviously)
- checkBobbin (if it’s full you won’t need to fill it so you can ignore the first step, but an empty one is fine too – see Step 1)
- checkThread (select the color thread or threads you’re going to be working with first before filling the bobbin(s))
NOTE: These step by step instructions can be used when setting up a top-loading sewing machine only.
If you have a non-top-loading machine, you will want to consult the manual.
Table of Contents
Step 1 – Filling the Bobbin
Locate the spool pin on your sewing machine. This is usually a thread spool’s length and comfortably holds the thread. Once you’ve found the spool pin, slide the thread onto the spool and place the cap or spool holder on it.
Some machines don’t have a cap, some have a flap, while others don’t have anything, so work with what your machine has.
After you’ve secured the thread in place, you’ll want to pull a line of thread away from the spool. This thread will be used to feed your bobbin.
Follow these steps to guide your thread to the bobbin.
- Run the thread to the bobbin thread guide. This is typically a screw-looking protrusion near the thread spool pin on the top of the machine. Though, depending on the machine will depend on where the pin is.
- Take the thread from the spool, lay it on top of the bobbin thread guide, and wrap it back underneath.
- Now your thread should be facing back toward the spool pin.
- Pull the thread from the bobbin thread guide over to the bobbin.
- There is a small hole in the bobbin that you will need to get the thread to go through. When you feed the thread through the hole, you’ll want to feed it from the inside of the bobbin to the outside. This makes filling the bobbin possible once you press the bobbin winder.
- With the thread held loosely through the hold, press the bobbin winder. This is typically located to the right of the bobbin.
- Once you release the stopper by pressing the bobbin winder, you’ll be able to control the spinning with either the foot pedal or the bobbin winder button.
- After the bobbin is full, stop the machine.
- Clip the end of the thread that you pulled through the top of the bobbin. It should be secured by the thread that is not on the bobbin.
- You can now cut and remove the full bobbin for later use.
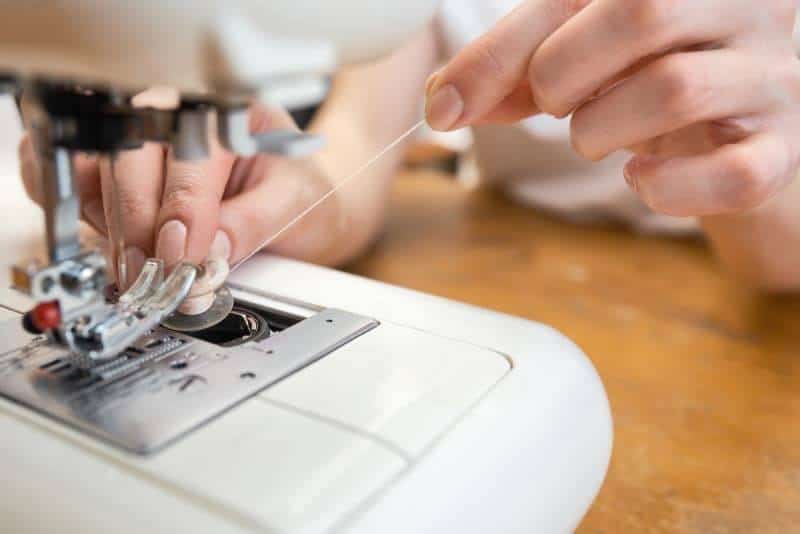
Step 2 – Threading Your Machine

Before you begin this step, I’d advise that you make sure your machine is turned off. This is simply for your safety!
Now that you’ve removed the full bobbin from the equation, you should have loose thread hanging from your spool again. This is what you will be using to thread your machine.
- Take the thread and place it around the upper thread guide. This is typically around the same area as the bobbin thread guide.
- Once you’ve done this, your thread should be hanging over the side of the machine.
- Then pull the thread down and around the small u-shaped area. This is likely on the side of your machine and is somewhat difficult to miss on most devices.
- Hold the thread somewhat tights to it interacts appropriately with the tension disc.
- After you finish drawing the thread through this u-shaped area, it should be coming back out of the top of the machine.
- Now turn the dial on the side of the machine to expose the take-up lever. You’ll want to get this up as high as it goes to make your life easier.
- Pull your thread through it or around it from left to right – depends on the machine – and make sure your thread sits in the “eye” of the lever.
- Lead the thread back down the left side of the u-shaped area down to where the needle is.
- Feed the thread down through 1-2 of the thread guides.
- Finish by taking the end of the thread and guiding it through the eye of the needle near the tip.
When you finish this step, you should only see the thread at the very top of the sewing machine, near the spool and at the bottom around the needle.
There should be enough thread pulled through the eye of the needle, so you have enough to work within the future.
Step 3 – Put the Bobbin in Place
The next is to put the full bobbin in place so you can finally start sewing.
If you don’t know, the point of a bobbin and the additional thread it provides is to make a more secure stitch. The machine makes this stitch by catching the bottom bobbin thread with the spool thread and pulling it back through the fabric.
Two threads = stronger stitch.
Follow these instructions to insert the bobbin.
- Uncover the bobbin cover plate. Located in front of the needle platform.
- Take the full bobbin and place it in the slot with the thread running out counterclockwise.
- You’ll want to make sure you’ve pulled out at least 6-9 inches of thread for the next few steps.
- To secure the bobbin in place, you’ll want to pull the thread through the notch in the bobbin slot.
- You’ll know you’re there when the thread falls into the second notch of the slot
Step 4 – Set the Bobbin Thread
The final step to setting up your sewing machine is to put the thread from the bobbin in place. Being that this is the last step, it’s important that you get it right. Otherwise, your stitch won’t be as reliable or may not work at all.
- Pull the machine spool thread taunt and turn the handwheel. This will move the bottom hook and hook the bobbin thread and pull it up.
- Once the bobbin thread has been pulled up, you should be able to grab it and pull it.
- Grab both threads (spool and bobbin) and pull them gently until you reach a point where both threads are fully out.
- You’ll want to pull both threads out toward the back of the machine toward the pressure foot.