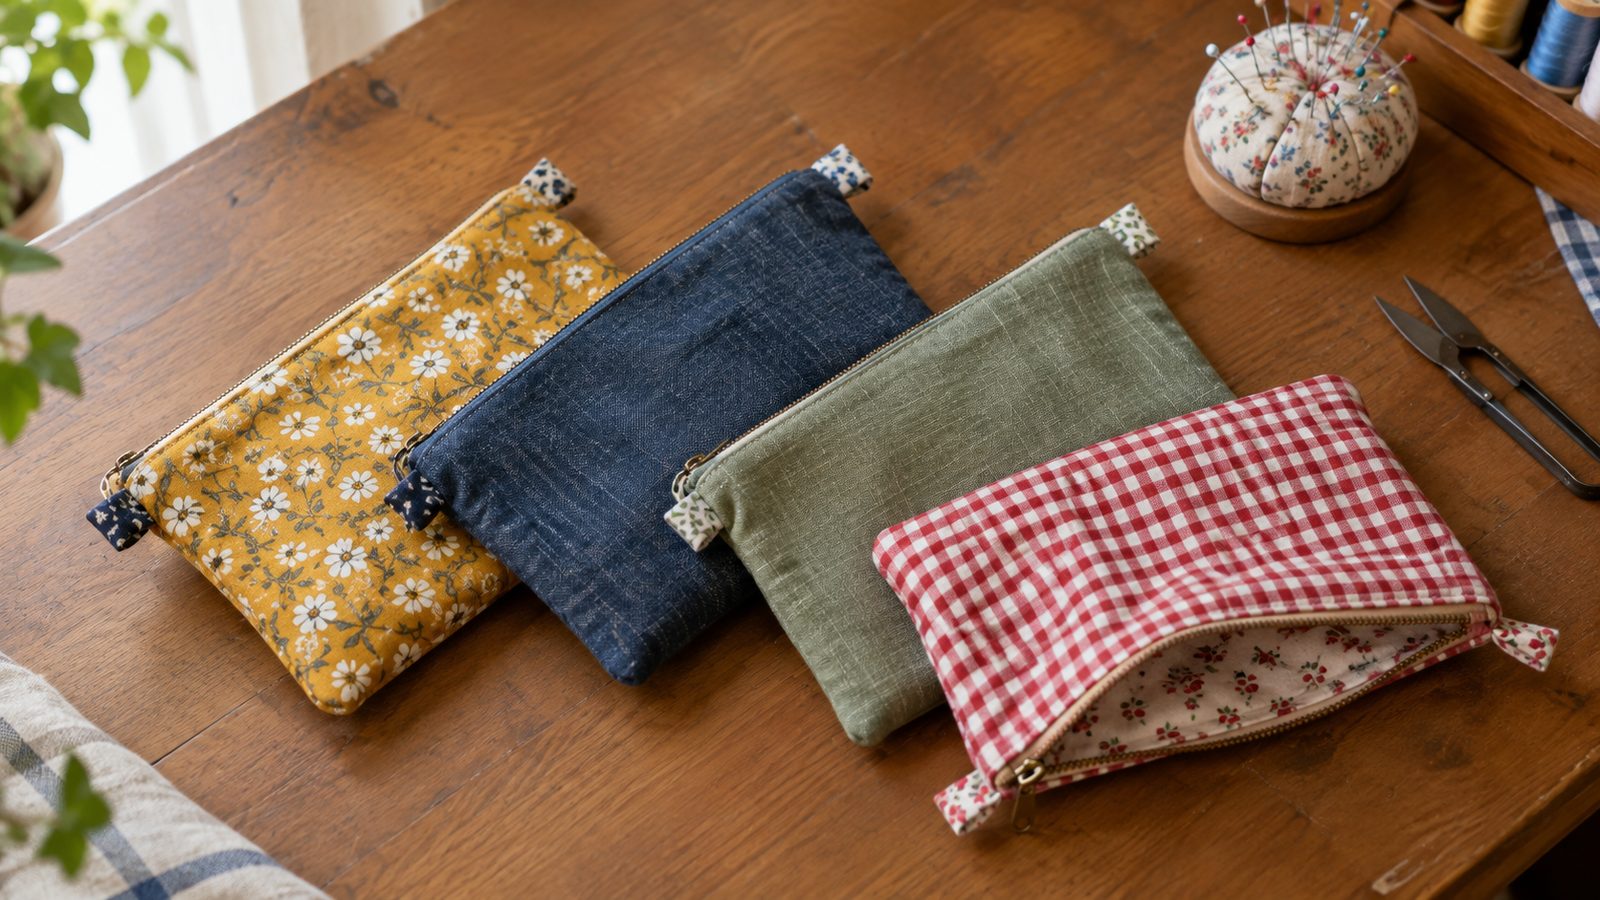
A lined zipper pouch is one of the most useful things you can make in an afternoon, and once you’ve sewn one, you’ll want a stack of them for pencils, cords, makeup, and snacks. This version finishes at about 9 x 6 inches, with a fully lined inside, tidy fabric tabs at both ends of the zipper, and crisp topstitching.
The whole trick comes down to a few moves: tabs on the zipper, one fabric sandwich per side, sewing smoothly past the zipper pull, and leaving the zipper half open before you sew the outer seams. Below you’ll find exact cut sizes, the zipper length to buy, and fixes for the usual hiccups.
What you’ll need
- Exterior fabric: a fat quarter of quilting cotton, canvas, or linen blend. Cut 2 panels at 10 x 6 3/4 inches.
- Lining fabric: a fat quarter of quilting cotton. Cut 2 panels at 10 x 6 3/4 inches.
- Zipper tabs: cut 2 rectangles at 2 x 3 inches from the exterior fabric or a contrast scrap.
- Interfacing: 2 pieces of woven fusible interfacing at 10 x 6 3/4 inches, or 2 pieces of fusible fleece at 9 x 6 inches for a soft, padded pouch.
- Zipper: one 12-inch nylon coil zipper (you’ll shorten it to fit).
- Matching all-purpose polyester thread
- Zipper foot, pins or clips, fabric marker, scissors or rotary cutter
- Iron and pressing surface
- Seam allowances: 1/4 inch along the zipper, 1/2 inch for the sides and bottom.
Prep the fabric, interfacing, and zipper
Start by pressing your fabrics and cutting the pieces from the list above. Cutting accuracy matters more on a small pouch than on a big project, because a quarter inch off on one panel shows up right at the zipper ends. A rotary cutter and ruler make this quick.
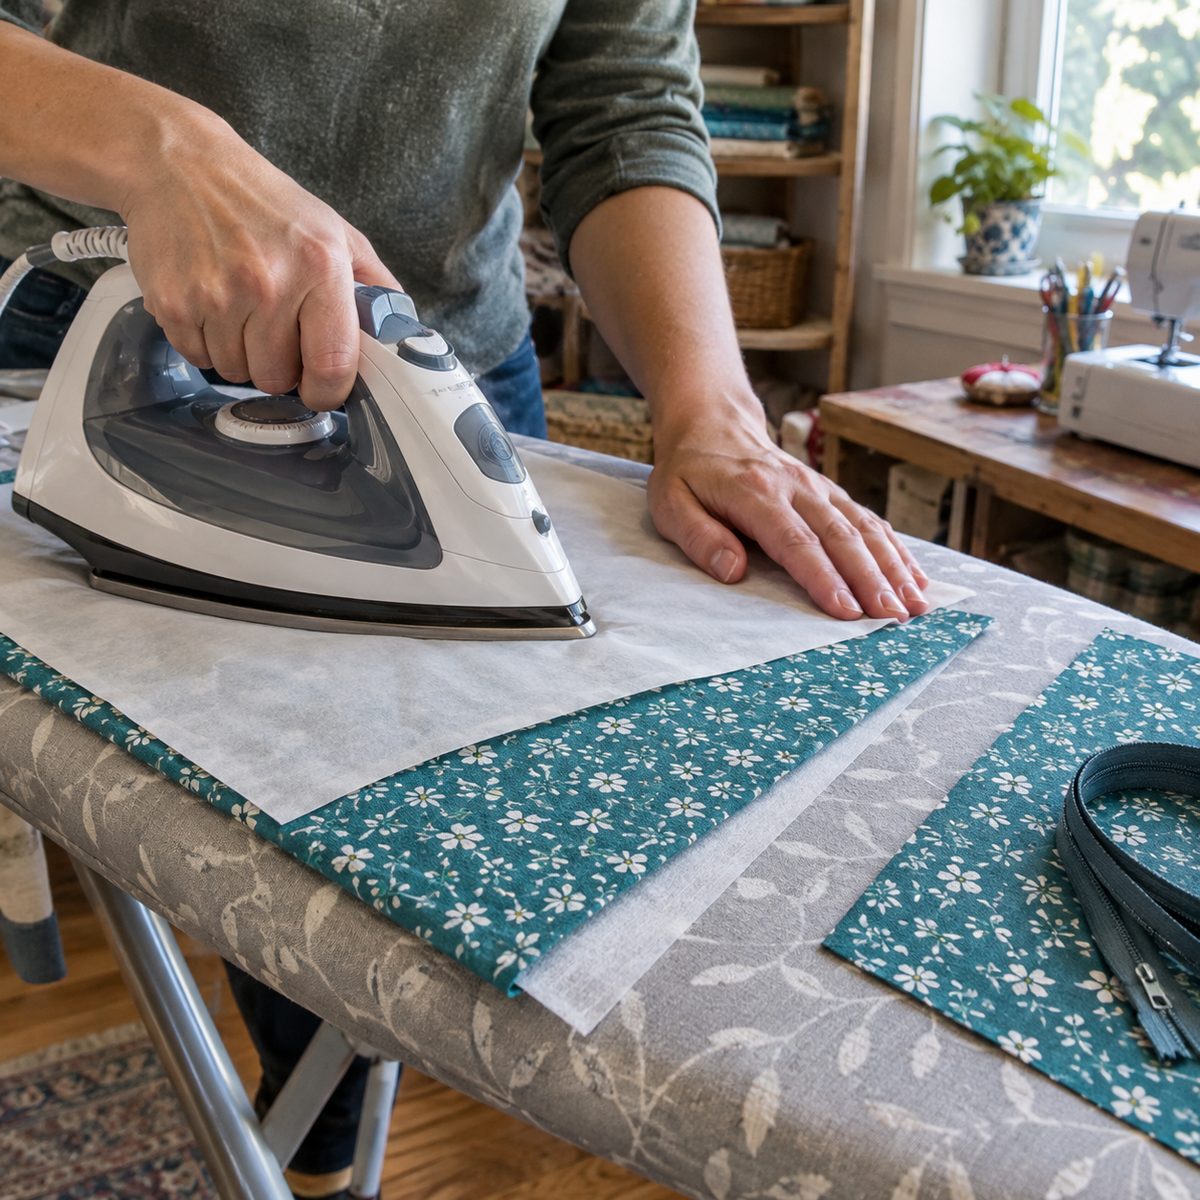
Next, fuse the interfacing to the wrong side of both exterior panels. Interfacing is what turns a floppy cotton rectangle into a pouch that stands up and holds its shape. If you’re not sure which type to pick, this guide on what interfacing is and how it works covers the options.
- Woven fusible interfacing is cut the same size as the panel (10 x 6 3/4 inches) and fused edge to edge. It gives a smooth, structured finish.
- Fusible fleece is bulkier, so cut it smaller (9 x 6 inches) and center it with 1/2 inch clear on the sides and bottom and 1/4 inch clear along the top. Keeping fleece out of the seam allowances makes the corners much easier to turn.
Use a press cloth and follow the manufacturer’s heat and time settings, pressing straight down rather than sliding the iron so nothing shifts. Let the panels cool flat before you handle them.
Finally, choose a nylon coil zipper rather than a metal one. Coil zippers can be cut to any length and sewn right across, which is exactly what the tab step needs. A 12-inch zipper gives you plenty to work with.
Make and attach the zipper tabs
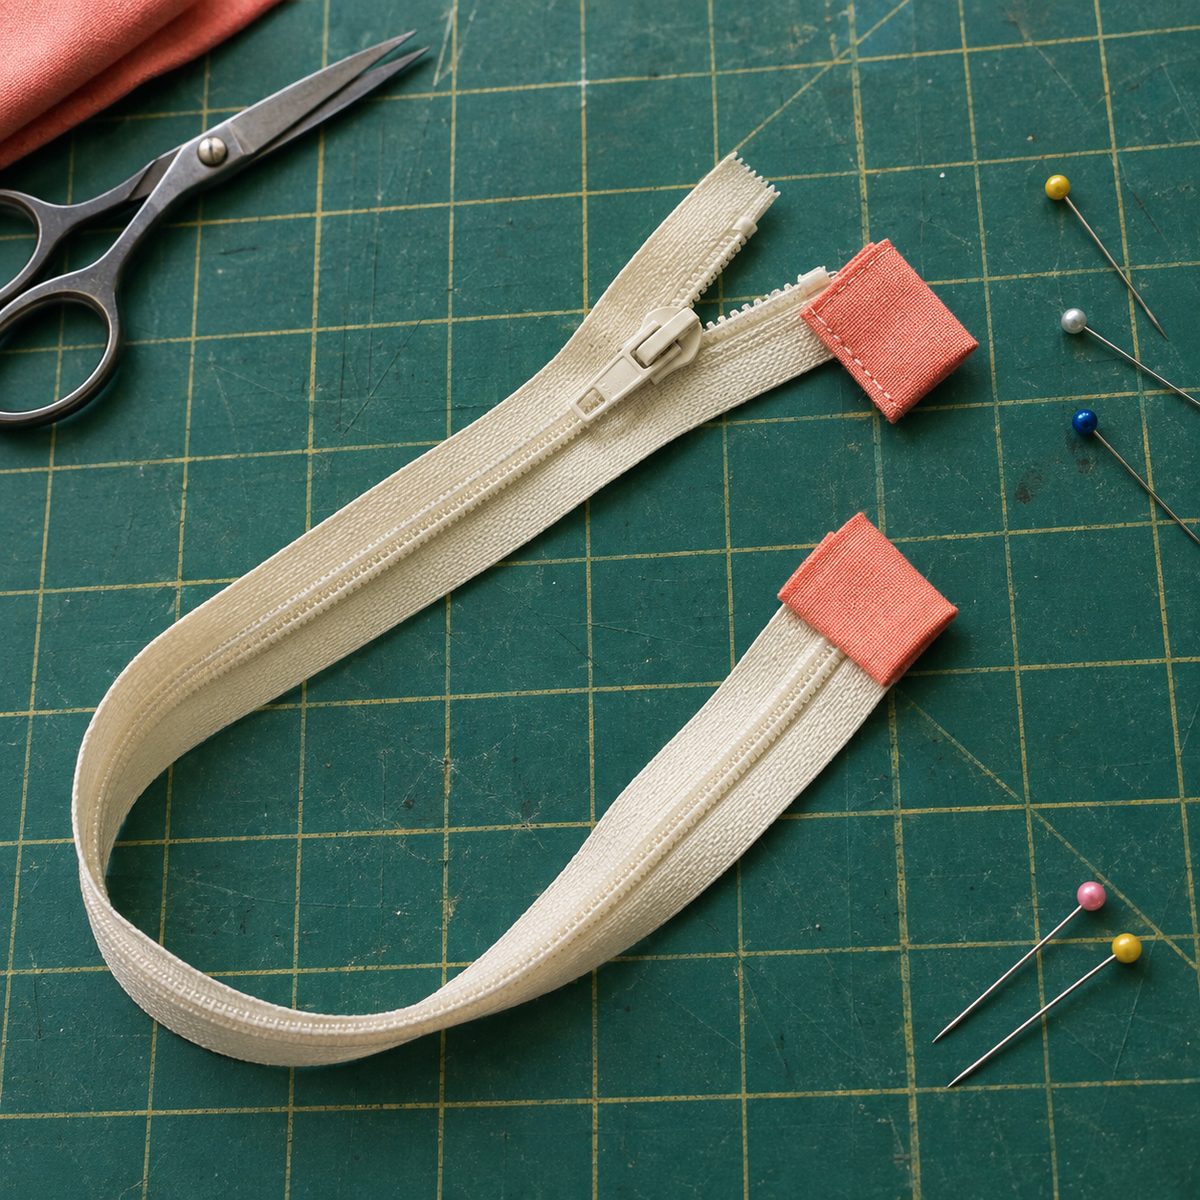
Zipper tabs are the small fabric caps on each end of the zipper. They cover the bulky zipper stops, keep the pull from sliding off once you shorten the zipper, and let the side seams close neatly without breaking a needle on a metal stop. They also just look finished and professional.
- Take one 2 x 3 inch tab rectangle. Fold it in half so the short ends meet, press, and open it back up.
- Fold each short raw edge in to meet that center crease and press. Then fold in half again along the original crease. You now have a little folded strip about 2 inches wide and 3/4 inch tall, like a tiny piece of binding. Make two.
- Slide the zipper pull toward the middle of the zipper. At the bottom end, trim the tape just below the metal bottom stop so the stop is gone.
- Tuck that cut end all the way into the fold of one tab, centered side to side, and edgestitch across the tab about 1/8 inch from its folded edge.
- Measure 9 1/4 inches from the outer edge of the sewn tab and mark across the zipper. Check that the pull is below this mark, then trim the zipper about 1/4 inch past the mark.
- Stitch back and forth across the coil at the mark a few times (a short zigzag works well) to create a new stop, then tuck the cut end into the second tab and edgestitch it closed.
- Trim the sides of the tabs even with the zipper tape. The zipper with tabs should now measure 10 inches end to end, the same width as your fabric panels.
Install the zipper, first side
Each side of the zipper goes into a three-layer sandwich: exterior panel, zipper, lining panel. Switch to your zipper foot and set a stitch length around 2.5 to 3 mm.
- Lay one exterior panel right side up with the 10-inch edge at the top.
- Place the zipper face down on top, lining up the zipper tape edge with the top raw edge of the panel. The tabs should line up with the side edges of the panel.
- Lay one lining panel face down on top so its top edge matches the others. The zipper is now sandwiched between the right sides of the exterior and lining.
- Pin or clip through all three layers and stitch 1/4 inch from the top edge, from one side all the way to the other.
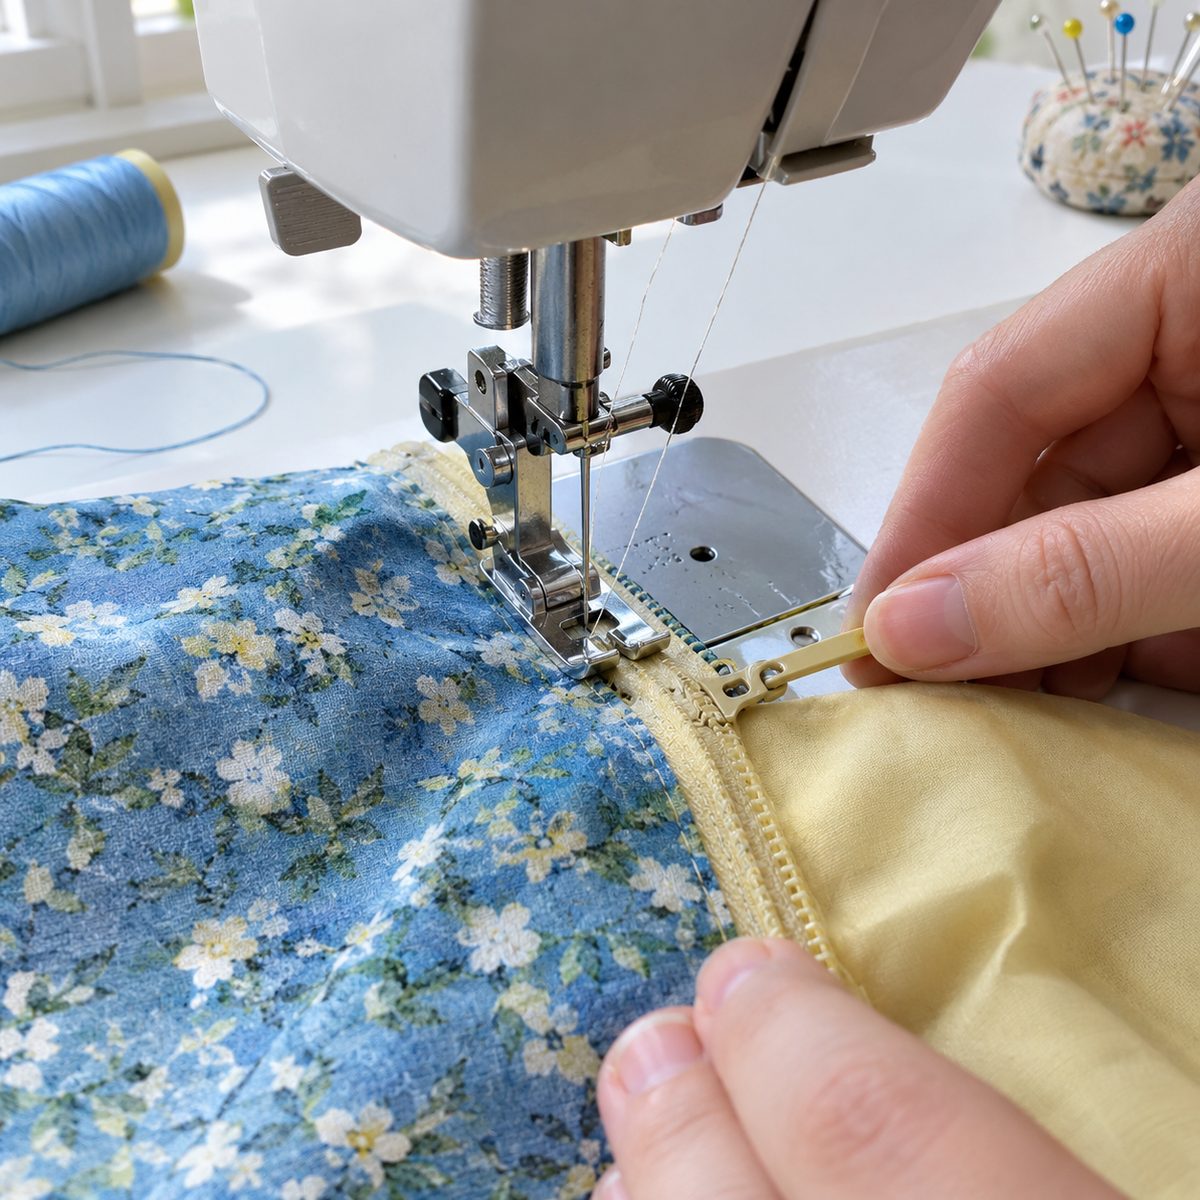
Sewing past the zipper pull: the pull is the reason zipper seams wobble. Start sewing with the pull about two inches from the end you’re sewing toward, or unzipped a few inches. When your stitching gets within about an inch of the pull, stop with the needle down, lift the presser foot, and gently slide the pull back behind the needle (you may need to wiggle it past the foot). Lower the foot and keep sewing. Your line stays straight because the pull is never next to the foot.
Fold the exterior and lining away from the zipper so they sit wrong sides together, and press along the fold so the fabric lies flat next to the coil. Take care not to melt the nylon teeth. Then topstitch through both fabric layers about 1/8 inch from the fold, again moving the pull out of the way when you get close to it. Topstitching keeps the lining from creeping into the zipper later and gives the pouch a crisp edge.
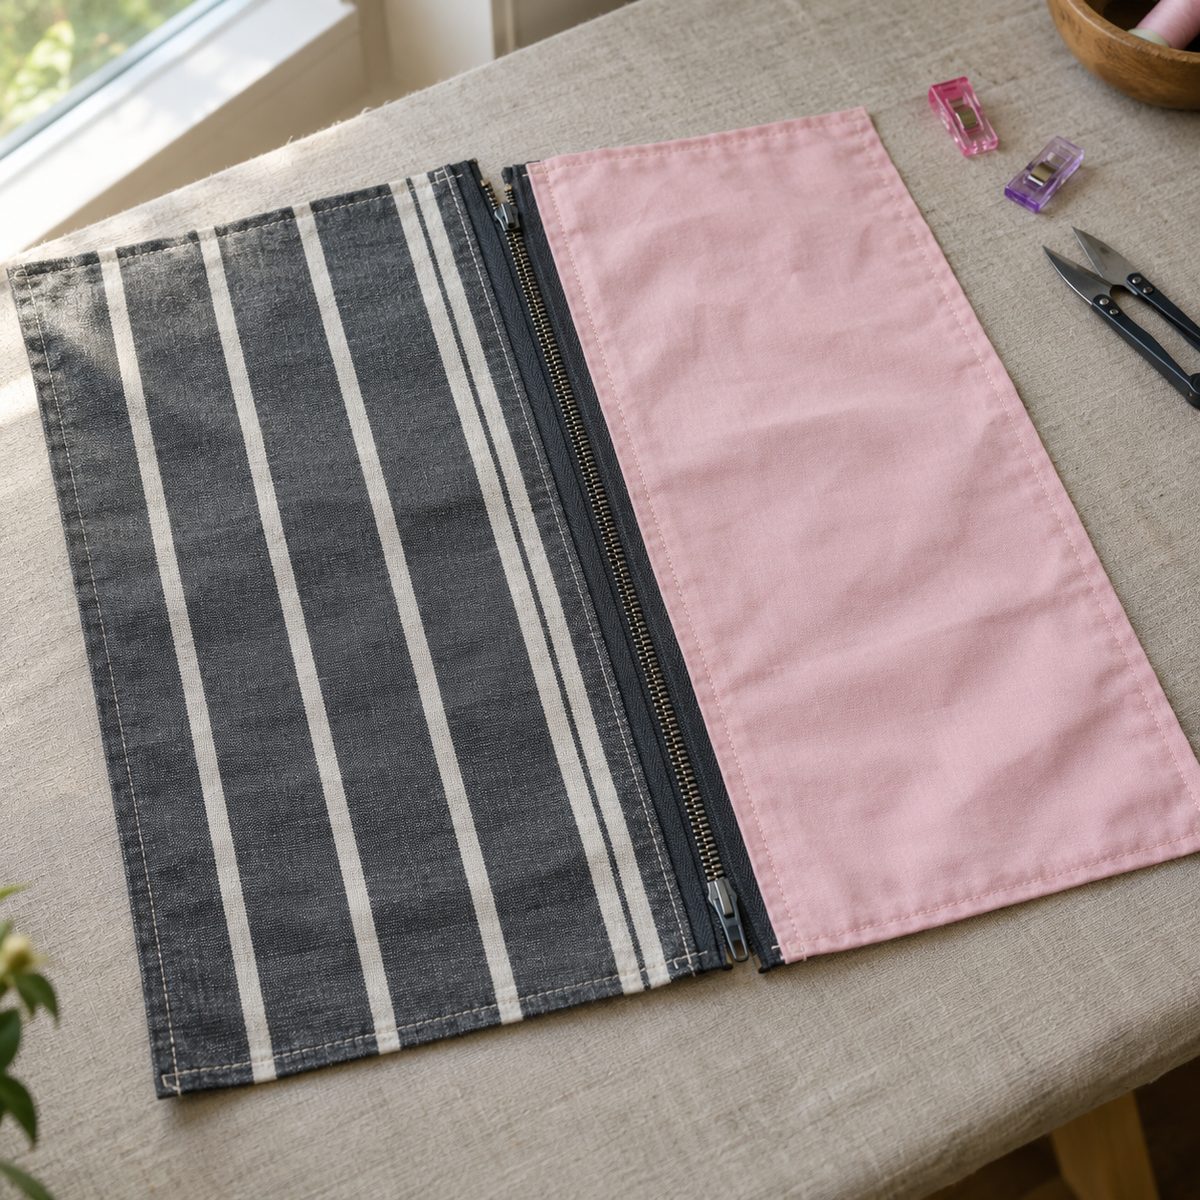
Install the zipper, second side
The second side is the same sandwich, just with the first side already hanging off the zipper.
- Lay the second exterior panel right side up.
- Place the zipper face down on it, with the free edge of the zipper tape aligned to the panel’s top edge. The first exterior panel will be facing the second one, right sides together.
- Lay the second lining panel face down on top, lining up its top edge. Fold the first side’s lining and exterior out of the way so they don’t get caught.
- Pin, stitch 1/4 inch from the edge, and move the pull past the needle as before.
- Press the fabrics away from the zipper and topstitch 1/8 inch from the fold.
Before moving on, check that the two exterior panels line up at the sides and bottom. If one is slightly longer, trim it now so the side seams match. Trimming a sliver at this stage is far easier than fighting a mismatched corner later.
Sew the shell and lining
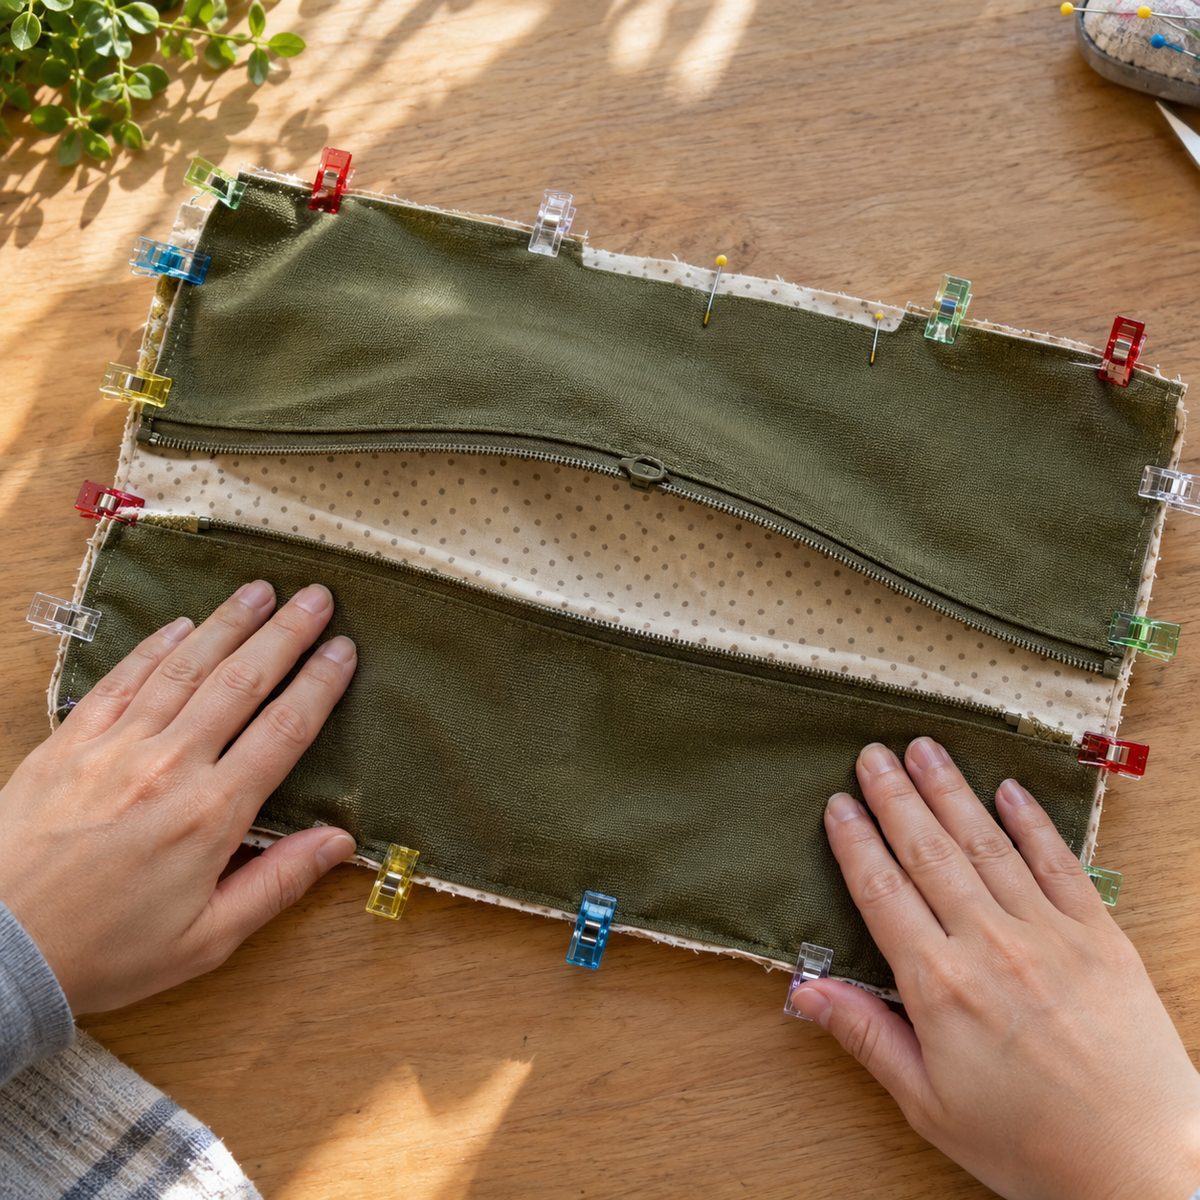
This is the step that most first pouches go wrong on, and the fix is simple: open the zipper at least halfway before you sew. Once the outer seams are closed, the only way to turn the pouch right side out is through the open zipper and the lining gap. If the zipper is closed, you’ll be unpicking.
- Unzip the zipper about halfway.
- Open the whole thing out and rearrange it so the two exterior panels are right sides together on one side and the two lining panels are right sides together on the other.
- At the zipper, fold the zipper teeth toward the lining side so the exterior fabrics meet cleanly at the zipper line. The tabs should be pointing toward the lining too.
- Pin or clip all the way around, matching the zipper seams exactly where they meet.
- Mark a 4-inch gap in the center of the lining’s bottom edge. This is your turning opening.
- Using a 1/2 inch seam allowance, sew around the whole outer edge: start at one side of the lining gap, sew up the lining side, across the zipper tabs, down the exterior side, along the exterior bottom, back up the other exterior side, across the second tab, down the lining side, and stop at the other end of the gap. Backstitch at both ends of the gap.
Go slowly over the tabs, since that’s the thickest spot. A size 90/14 needle handles the layers comfortably, and if the stitches look loose or loopy there, a quick check of your sewing machine tension usually sorts it out.
If you’re skipping boxed corners, clip the four bottom corners diagonally, staying a thread or two away from the stitching, and trim the seam allowance at the tab ends to cut bulk.
Box the corners (optional)
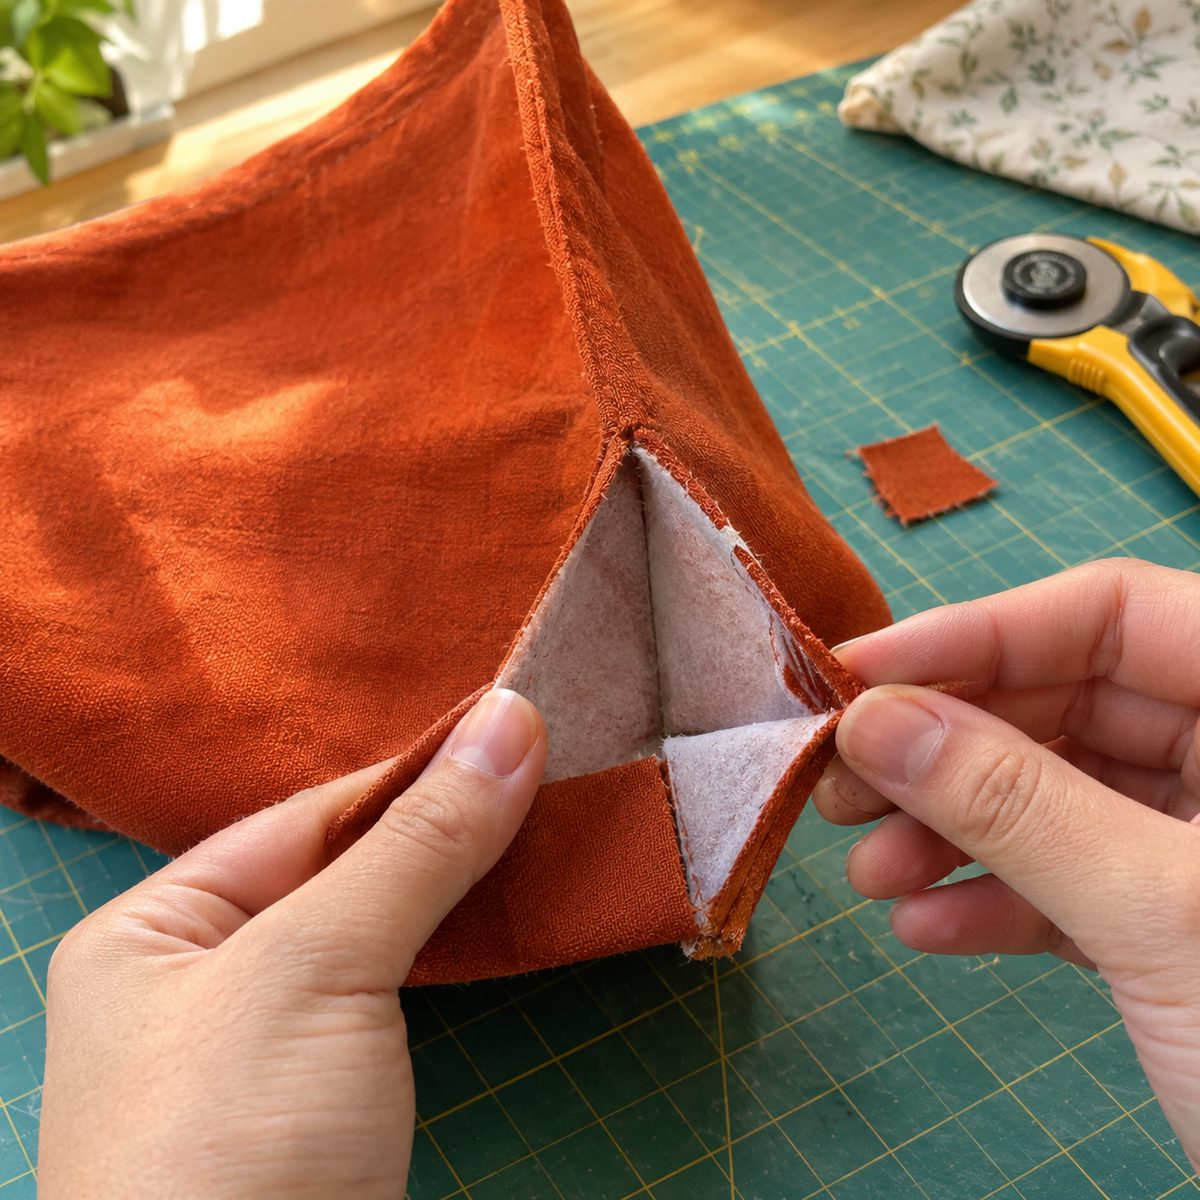
Boxed corners give the pouch a flat bottom so it sits up on a desk and holds more. They also make the finished pouch smaller in width and height, so decide before you cut if size matters. With the standard cut sizes, the boxed pouch comes out about 7 inches wide, 5 inches tall, and 2 inches deep.
- At each of the four bottom corners (two on the exterior, two on the lining), cut out a 1 1/2 inch square, measuring from the raw edges, not from the stitching.
- Pull the corner open and flatten it so the side seam sits directly on top of the bottom seam. The cut edges now form one straight line.
- Pin with the seams nested in opposite directions and stitch straight across with a 1/2 inch seam. Backstitch at both ends.
- Repeat for all four corners.
If you’d like a boxed pouch that still measures about 9 x 6 inches across the front, cut the exterior, lining, and interfacing at 12 x 7 3/4 inches instead and use a 14-inch zipper trimmed so the zipper plus tabs measures 12 inches. The same boxing method is used on this lined tote bag with boxed corners, just on a bigger scale.
Turn and finish the pouch
- Reach through the lining gap, find the open zipper, and pull the exterior through it. Then pull everything out through the gap.
- Use a chopstick or point turner to gently push out the corners of the exterior. Don’t force a sharp tool through the fabric.
- Close the lining gap. Tuck the raw edges in by 1/2 inch, press, and either edgestitch across by machine or close it with a ladder stitch by hand for an invisible finish.
- Push the lining down inside the pouch, working it all the way into the corners.
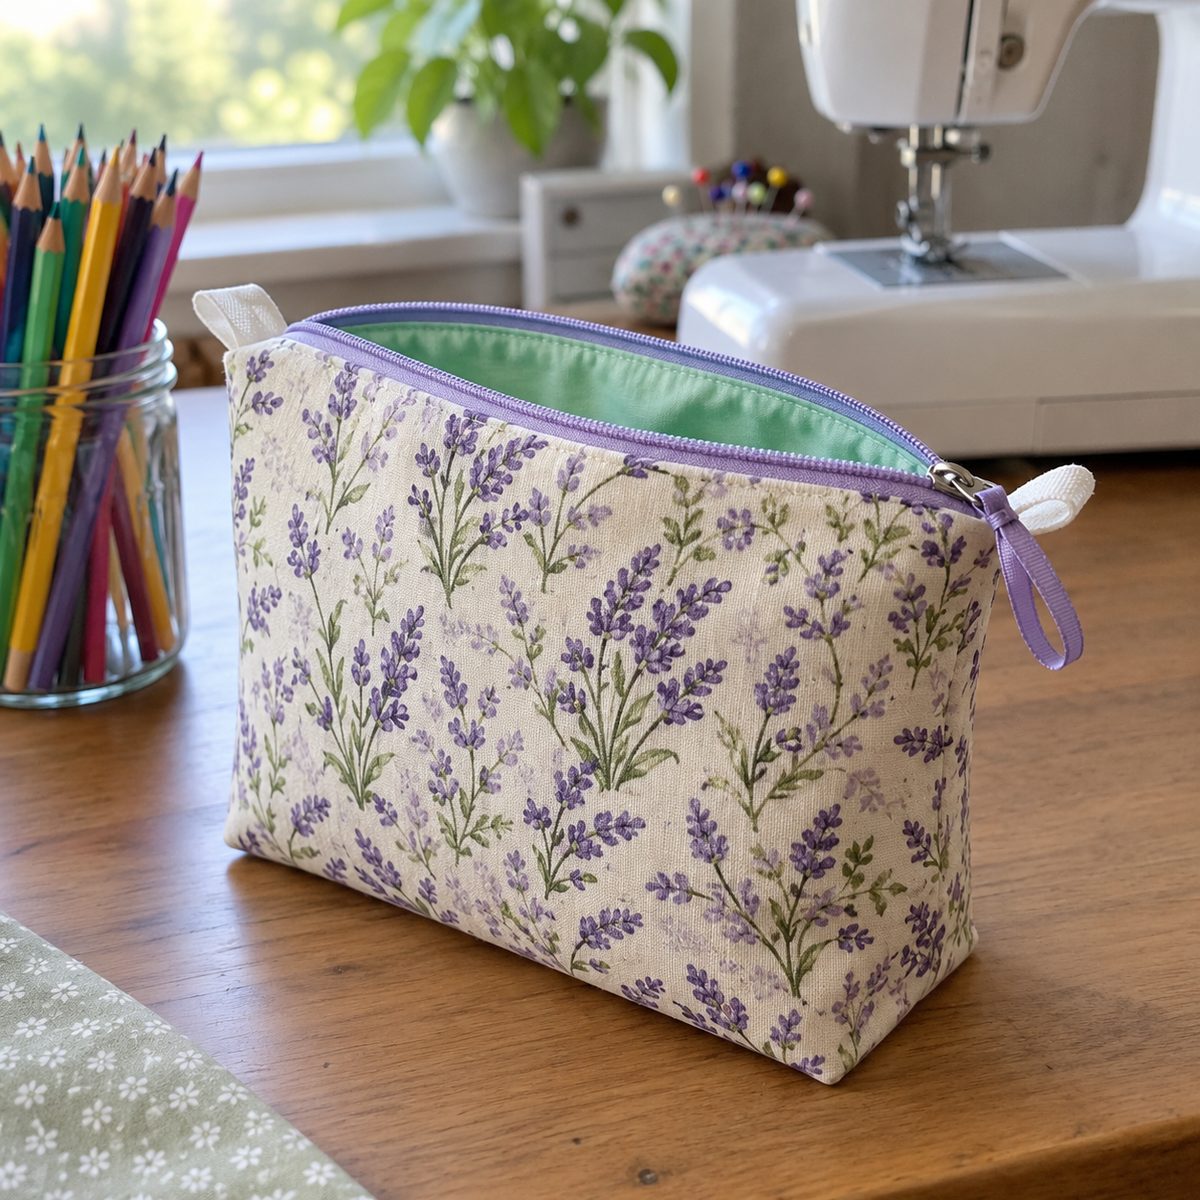
- Give it a final press, using a press cloth around the zipper. Pressing the side seams and top edges firmly makes a real difference in how finished the pouch looks.
If you want a quick refresher on why pressing beats ironing on projects like this, pressing vs. ironing is worth a read. Add a ribbon loop or a leather tab to the zipper pull if you like, and you’re done.
Troubleshooting common zipper pouch problems
The zipper stitching wobbles near the pull
That’s the pull pushing the foot sideways. Stop sooner, with the needle down, and move the pull farther behind the needle before you continue. Sewing with the zipper partly open from the start helps too.
The fabric is wavy along the zipper
This usually means the layers shifted while sewing. Use clips instead of pins, fuse your interfacing well, and try a slightly longer stitch. A walking foot works well for topstitching if you have one.
There’s a gap or pucker at the zipper ends
Your zipper-plus-tabs is probably shorter or longer than the panel width. Measure it before installing and aim for exactly 10 inches. When sewing the outer seam, stitch right across the tab rather than curving around it.
The lining catches in the zipper
Topstitching is the fix. If you skipped it, you can add it after turning by pulling the lining snug and stitching 1/8 inch from the zipper through all layers.
I forgot to open the zipper before sewing the sides
Don’t unpick yet. Reach in through the lining gap, find the zipper pull from the inside, and work it open with your fingers. It’s fiddly, but it almost always works.
The corners are lumpy after turning
Trim the seam allowance at the corners and tab ends more closely, and if you used fusible fleece, make sure it stays out of the seam allowances.
Frequently asked questions
What size zipper do I need for a 9 x 6 inch pouch?
Buy a nylon coil zipper at least 10 inches long; a 12-inch zipper is easiest because it leaves room to trim. You’ll shorten it and add fabric tabs so the whole zipper, tabs included, measures 10 inches, matching the width of the cut panels. Coil zippers can be cut and sewn across safely, while metal zippers need the teeth removed first.
Do I need interfacing in a zipper pouch?
You can skip it, but the pouch will be soft and floppy, especially in quilting cotton. Woven fusible interfacing gives a smooth, lightly structured pouch, and fusible fleece gives a plush, padded one that’s nice for electronics or makeup. If you’re using canvas or a heavier home decor fabric, you may not need any interfacing at all.
Can I make this pouch without zipper tabs?
Yes. Buy a zipper about an inch longer than your panels and install it so the metal stops sit outside the side seams. After sewing the sides, trim off the excess zipper. It works, but the ends are bulkier and you need to be careful not to sew across a metal stop. Tabs give a neater finish for very little extra time.
Which fabric is best for a first zipper pouch?
Medium-weight quilting cotton with woven fusible interfacing is the easiest combination. It presses crisply, feeds evenly under a zipper foot, and doesn’t shift much. Canvas and linen blends look great but are thicker at the tabs. Leave slippery fabrics, vinyl, and laminated cotton for your second or third pouch, once the steps feel familiar.
Your first pouch will teach you more than any set of instructions can, and the second one always comes out noticeably neater. Once you’re comfortable, try mixing prints between the exterior and lining, adding boxed corners, or scaling the cut sizes up for a bigger toiletry bag. They make great gifts too, and a stack of them uses up fabric scraps beautifully.